Going Beyond the Sentiment Score, Part 1: Sentiment.js
An example of what we’ll be doing in this article

A good few years back, I used to work for a bank where part of my daily job was to monitor and evaluate the “happiness score” of our customers across several social media platforms, using a tool called Brandwatch. Amongst many other things, this platform offered its customers the ability to define a set of rules and add a corresponding sentiment tag to each and every mention of their brand or of any of their competitors.
I would then aggregate this score, and send monthly customer sentiment reports to senior leadership. These x would then invariably lead to that dreaded question: “Yes, but can you show me what people are actually saying?”.
Since then, several new pretrained models such as HugginFace’s SiEBERT or CardiffNLP have emerged and generated a lot of attention (no pun intended). But eventhough each of these new models aims to deliver more accurate sentiment score results, I still find it at times difficult to explain the nuances of how a sentiment score is calculated, in a way that is both insightful and easy to understand for a non-technical audience.
A score, and then what?
To better illustrate what I meant in the introduction of this article, let’s consider a typical online tutorial on how to compute a sentiment score from some random data source.
Most likely, it will primarily focus on what model or architecture to choose from, and then show how to output a global sentiment score for each text variable within a tabular dataset. Don’t get me wrong, this is great, and in most cases there’s no real reason to go beyond these steps.
However, I sometimes feel that not digging any further might lead us to turn a blind eye to the potential complexity and nuances of each processed text snippet. The following example might prove useful if this sounds too confusing:
| Sentence |
|---|
| => |
| Mmmh I love pizzas. |
| I absolutely hate onions. |
Typically, the article or tutorial that we are following will first process the above sentences through a given model, and output the following results:
| Sentence | Score | Sentiment |
|---|---|---|
| => | ||
| Mmmh I love pizzas. | 0.5 | Positive |
| I absolutely hate onions. | -0.5 | Negative |
At this point, we are usually shown a couple of histogram plots for the "score" serie, which more often than not pretty much conclude the demonstration.
Though I have nothing against the above process, I can’t help but think that it is at best incomplete, and in some cases potentially misleading. For instance, what if the two sentences above got merged into one?
| Sentence | Score | Sentiment |
|---|---|---|
| => | ||
| Mmmh I love pizzas, but I absolutely hate onions. | 0 | Neutral |
The issue here, is that our new sentence is far from being neutral or “deprived” of any sentiment. It is on the contrary pretty opinionated. Now, in all fairness, most NLP libraries, such as NLTK, will provide a set of useful extra scores, such as compound (see this great thread for more details), neutral, positive, and negative.
However, though these metrics will help us retrieve a sentiment score for our corpus, they will not tell us which terms in that corpus are responsible for each of the scores.
The good news is, this is exactly what a tiny npm package named Sentiment.js will be doing for us.
I have an AFINNity with Sentiment.js
According to its authors, Sentiment.js is:
“a Node.js module that uses the AFINN-165 wordlist and Emoji Sentiment Ranking to perform sentiment analysis on arbitrary blocks of input text.”
Before we do anything, it’d be a good idea to quickly discuss what this AFINN-165 wordlist stands for. Simply put, it’s a lexicon that contains thousands of terms, and a corresponding sentiment score for each. You can find its most recent version here, and I suggest reading about Valence-based sentiment scores there.
We can now go back to our initial corpus, aka the three arguably very generic sentences that we discussed earlier in this article:
let corpus = [
    "Mmmh I love pizzas.",
    "I absolutely hate onions.",
    "Mmmh I love pizzas, but I absolutely hate onions."
]
Importing the Sentiment.js package and initialising our first analyzer is pretty straightfoward:
const sentiment = require("sentiment");
sent = new sentiment();
let result = sent.analyze("any text that you want to compute a sentiment score for")
We’re now ready to process and evaluate some textual data, which is just going to be the first sentence from our corpus array:
const getSentiment = (data) => {
    let result = sent.analyze(data);
    for (let r in result) {
        console.log(r, result[r])
    }
}

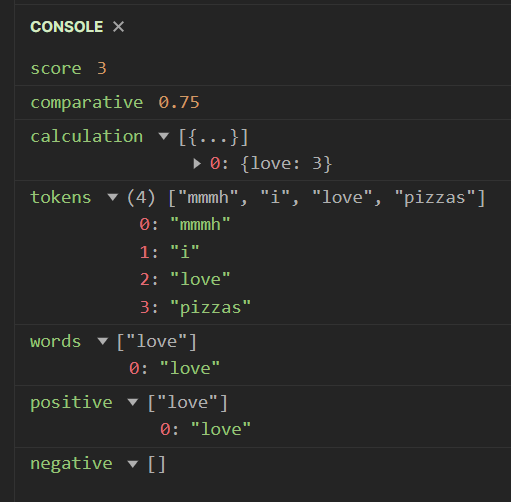
As you can see, Sentiment.js returns an object, which contains quite a bit of interesting information:
- score: calculated by adding the sentiment values of recognized words.
- comparative: comparative score of the input string
- calculation: an array of words that have a negative or positive valence with their respective AFINN score
- tokens: all the tokens like words or emojis found in the input string, minus punctuation signs
- words: the list of words from input string that were found in AFINN list
- positive: the positive terms were found in AFINN list, if any.
- negative: the positive terms that were found in AFINN list, if any.
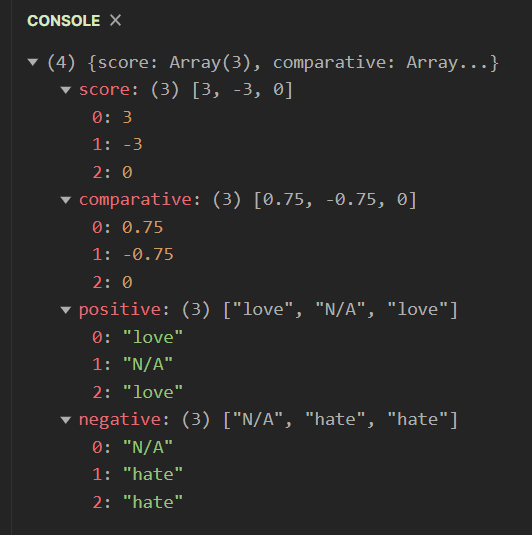
As you have probably already guessed, what’s most relevant to us here is the values contained within the positive and negative arrays. So what we should do now, is loop through our corpus array and output not just the overall AFINN score but also the terms that determine that score (if any). To do so, we’ll need to save these values as a JavaScript object, which will come in handy at a later stage.
let struct = {
    sentence: [],
    score: [],
    comparative: [],
    positive: [],
    negative: []
}
The following function will store our values into a struct object, replacing any null value with a string:
const parseSentiment = (data) => {
    let result = sent.analyze(data);
    for (let r in result) {
      if (r === "tokens") {
          struct["sentence"].push(result[r].join(" "))
      }
      else if (r === "score") {
          struct["score"].push(result[r])
      }
      else if (r === "comparative") {
          struct["comparative"].push(result[r])
      }
      else if (r === "positive") {
          if (result[r].length === 0) {
              struct["positive"].push("N/A")
          }
          else {
              struct["positive"].push(result[r].join())
          }
      }
      else if (r === "negative") {
          if (result[r].length === 0) {
              struct["negative"].push("N/A")
          }
          else {
              struct["negative"].push(result[r].join())
      }
    }
  }
}
As discussed earlier, all we have to do now is loop through our corpus array and then output the struct object:
corpus.forEach(
    c => parseSentiment(c);
)

for (let s in struct) {
    console.log(s, struct[s]);
}

From tabular data..
Wait a minute, didn’t we initially discuss working with tabular data? For the purpose of this article, I have quickly pasted a few random sentences into a spreadsheet, which I have then uploaded onto my GitHub page.
There are multiple ways that we can fetch and parse an online csv file. While most people will combine the Fetch and PapaParse packages, we’re going to use d3’s built-in csv() method instead. The fetchData() function below will return a promise. If you’re not too familiar with the concept of asynchronous operations in JavaScript, I highly recommend this great article.
const d3 = require("d3");

let sent_file = "https://raw.githubusercontent.com/julien-blanchard/dbs/main/sentiment.csv";

const fetchData = (data) => {
        d3.csv(data).then(csv_file => {
        for (let c in csv_file) {
            if (csv_file[c]["Sentence"]) {
                console.log(csv_file[c]["Sentence"]);
             }
        }
     })
    }

fetchData(sent_file)

As you can see, the fetchData() function has successfully parsed our small csv file. Though we could continue working direcly inside that function, we’re going to tweak it slightly that it returns an array of strings that we can access from a second function:
// Slightly tweaked function

const fetchData = (data) => {
        return d3.csv(data).then(csv_file => {
        let fetched = [];
        for (let c in csv_file) {
            if (csv_file[c]["Sentence"]) {
                fetched.push(csv_file[c]["Sentence"]);
             }
        }
        return fetched;
     })
  }

// A second function that will retrieve an array of strings from our first function

const parseData = async (data) => {
     let parsed = await fetchData(data);
         for (let p of parsed) {
             console.log(p);
     }
 }
We’re going to use these two functions, which at the moment aren’t doing anything, and combine them with our struct and our parseSentiment() function:
const sentiment = require("sentiment");
const d3 = require("d3");

// initializing the sentiment package
sent = new sentiment();

// data structures
let csv_file = "https://raw.githubusercontent.com/julien-blanchard/dbs/main/sentiment.csv";

// functions
const fetchData = (data) => {
        return d3.csv(data).then(csv_file => {
        let fetched = [];
        let struct = {
            sentence: [],
            score: [],
            comparative: [],
            positive: [],
            negative: []
        }
        for (let c in csv_file) {
            if (csv_file[c]["Sentence"]) {
                fetched.push(csv_file[c]["Sentence"]);
             }
        }
        for (let f of fetched) {
            getSentiment(f,struct);
        }
        return struct;
     })
    }

const getSentiment = (data,data_structure) => {
  let result = sent.analyze(data);
  for (let r in result) {
    if (r === "tokens") {
      data_structure["sentence"].push(result[r].join(" "))
    }
    if (r === "score") {
      data_structure["score"].push(result[r])
    }
    else if (r === "comparative") {
      data_structure["comparative"].push(result[r])
    }
    else if (r === "positive") {
      if (result[r].length === 0) {
        data_structure["positive"].push("N/A")
      }
      else {
        data_structure["positive"].push(result[r].join())
      }
    }
    else if (r === "negative") {
      if (result[r].length === 0) {
        data_structure["negative"].push("N/A")
      }
      else {
        data_structure["negative"].push(result[r].join())
      }
    }
  }
}

const getParsedData = async (data) => {
  let parsed = await fetchData(data);
  for (let p in parsed) {
      console.log(p, parsed[p]);
  }
}

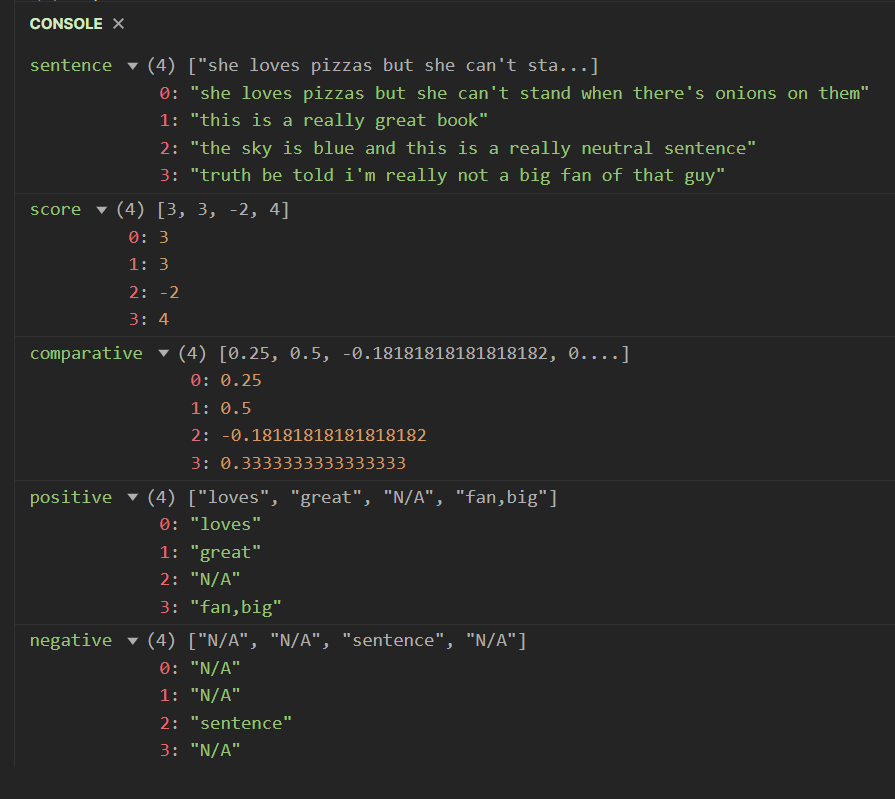
getParsedData(csv_file);

The changes we just made are pretty straightforward:
- we have moved the
structobject into thefetchData()function, which will return it as returns a promise - the
getSentiment()function has been kept separate, but will be processed within thefetchData()function
..To tabular data!
If you’re a data scientist or a data analyst, you’ve then probably heard that story: JavaScript and tabular data aren’t exactly best friends. Historically, JavaScript (like many other languages, I’m looking at you Ruby) has certainly missed the data science / machine learning hype train. And in all fairness, a lot of the points made against using it as a substitute for Python or R for numerical computing are pretty valid. For instance, if you try to divide by zero, you’ll get a floating-point standard NaN. Worse, this NaN value will still be treated as a number..
However, the past couple of years have seen the development of some incredibly powerful data transformation and analysis packages. I wrote in September last year a long article on Danfo.js, a very powerful Pandas-inspired library for working with tabular data. For this article though, we’re going to use a fairly new package named Arquero (“arrow” in Spanish), which according to its creators takes inspiration from R’s Dplyr.
Remember the long set of functions that we defined earlier? We had stored our data in an object named struct, and our only wayt of visualising its content was to loop through its key and value pairs. Well the good news is, Arquero will very easily read this format and transform it into a dataframe!
To avoid any confusion, we’ll rename our getParsedData() to a better suited getDataFrame(). Once we have installed the latest Arquero package, we can simply import it as follows:
const aq = require("arquero");
Working with this library only requires some basic understanding of method chaining, which shouldn’t be an issue for us:
const getDataFrame = async (data) => {
  let parsed = await fetchData(data);
  aq.table(parsed)
    .select("sentence","score","comparative","positive","negative")
    .orderby(aq.desc("score"))
    .print()
}

getDataFrame(csv_file);

Let’s go through what we just did:
- we created a dataframe from the
parsedobject, which really is just another name for our earlierstructobject - the
.select()method has no effect here, as we are selecting all the series that are already in the dataframe. But I wanted to show how easy it is to filter out any superfluous array - the ‘orderby()’ method does just what it says, it’s the Arquero equivalent for Pandas’s
sort_values() - finally, we’re outputting our dataframe to the console using the built-in
print()method
And that’s it for today! I hope you enjoyed this article!