Automating Pipelines With Airflow's TaskGroup
Earlier this year, I got involved in a fun little side project at work. As part of our “Build Great Teams” initiative, I was tasked with providing a simple tech newsletter for my co-workers. We didn’t need anything fancy really: just a bi-weekly curation of articles that I could find about data science, programming, and the tech industry in general.
As the project gained in scope, I decided to refactor the couple of Python scripts I had written so that I could get the whole pipeline to run from a Raspberry Pi at home.
In this article, we’ll see how to organise a simple DAG using Apache Airflow’s @task_group decorator. If you’re looking for a comprehensive guide on how to use Airflow, I can only but recommend this fantastic website.
And though we’ll be working with some relatively simple live data, I’m sure we’re still going to have a ton of fun!
An extremely basic pipeline
Contrary to popular opinion, it doesn’t always rain in Ireland. As a matter of fact, we’ve just had a pretty decent summer, with temperatures even reaching the mid twenties a couple of weeks ago.
If you’ve ever visited the country, chances are you might have heard of Met Eireann. They’re the state meteorological service of Ireland, and like a lot of other state-owned entities, they’ve made some of their data open and available to the general public.
Of particular interest to us is a simple xml file named “web-3Dayforecast” that can be found through Ireland’s Open Data Portal. The reasons why we want to work with this particular dataset are as follows:
- It is updated daily, which means we can set an Airflow DAG to run each day at a specific time and fetch some new weather predictions
- It’s really simple. Each “prediction” consists of a combination of two or three terms (ex: “MEDIUM_RAIN_SHOWERS”). As the xml file provides a 3 day forecast for the 9 largest Irish cities, this means that once converted to tabular format, our daily updates will only feature 3 x 9 = 27 rows.
- It’s just a plain xml file: no API key is required, no subscription, no rate limit, etc..
As mentioned just above, accessing this xml file is very straightforward:
import requests

req = requests.get("https://www.met.ie/Open_Data/xml/web-3Dayforecast.xml")
print(req.text)
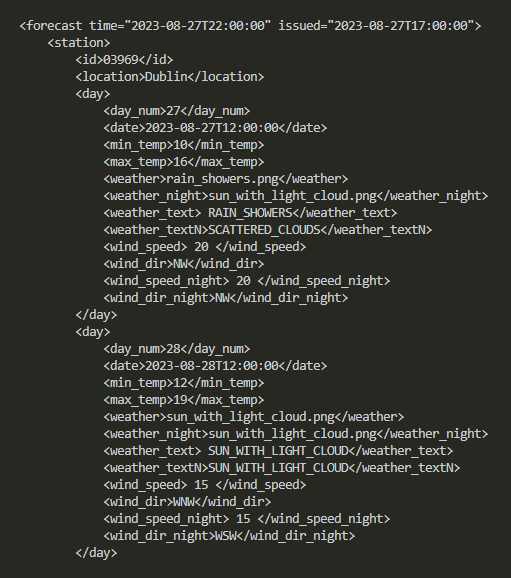
Skipping a few steps, if we wanted to create a SQLite table that captures and stores all of this data, we’d probably have to initialise it as follows:
forecast_table = """
CREATE TABLE IF NOT EXISTS forecasts (
city text,
day text,
min_temp real,
max_temp real,
forecast_day text,
forecast_night text,
wind_speed_day real,
wind_dir_day text,
wind_speed_night real,
wind_dir_night text;
)
"""
But that’s not what we’re going to do. Instead, we want first to transform the xml file into json format, and then create a Pandas dataframe object that we can convert into a SQL table.
Now dear readers, I highly recommend you NOT to do that if your goal is to build anything serious. What you should do instead, is create a proper table, set a primary key, some constraints, decide as to whether you want to allow NULL values or not, as well as follow some proper data sanitization and normalization practices. As the table that we’re going to create in a couple of minutes will contain a ton of duplicate string values, we should also work on a logical model first before making sure our data follows at least the first three rules of normalization. Last but not least, we might want to use a library like Typing, or even better MyPy to ensure some basic type safety, as well as avoid using SQLite in the first place.
That being said, the primary purpose of this article is to show how to use Airflow’s TaskGroup. We don’t intend to send any of our work to production, nor to run our pipeline for more than a few weeks. In other words, we’re going to disregard good practices and simply focus on how to group tasks within a simple DAG.
With this out of the way, let’s first create a virtual environment and activate it:
virtualenv venv_sql_airflow
cd venv_sql_airflow
source bin/activate
Actually, the only good practice that we’re going to follow is to store some high-level information in a setup.ini file, that we can then easily access using the ConfigParser standard module:
[PATHS]
weather_url = https://www.met.ie/Open_Data/xml/web-3Dayforecast.xml
db = /db/weather.db
After installing a bunch of libraries such as XMLtodict, our next step is to create a file called data_functions.py and start tweaking with our xml data:
import requests
import xmltodict
import json

def fetchData(url):
    req = requests.get(url)
    decoded = req.content.decode("utf-8")
    decoded_json = json.loads(
        json.dumps(
            xmltodict.parse(
                decoded
                )
            )
        )
    return decoded_json
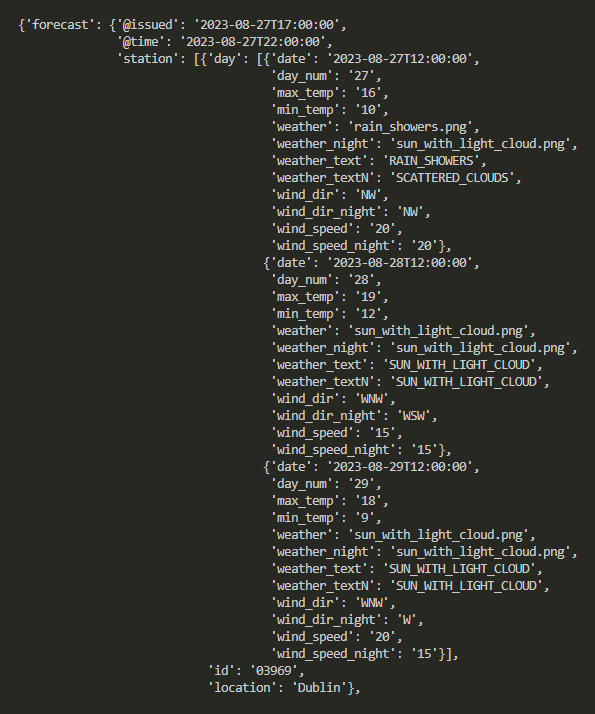
What we need next is a dictionary, where the keys are the titles that we want to give to the columns of our Pandas dataframe, and the values an array of the predictions contained in our json file:
import pandas as pd

def getWeatherDataFrame(input_json,output_dict):
    for k,v in input_json["forecast"].items():
        if k == "station":
            for station in v:
                for s in station["day"]:
                    output_dict["county"].append(station["location"])
                    output_dict["day"].append(s["date"])
                    output_dict["min_temp"].append(s["min_temp"])
                    output_dict["max_temp"].append(s["max_temp"])
                    output_dict["forecast_day"].append(s["weather_text"])
                    output_dict["forecast_night"].append(s["weather_textN"])
                    output_dict["wind_speed_day"].append(s["wind_speed"])
                    output_dict["wind_dir_day"].append(s["wind_dir"])
                    output_dict["wind_speed_night"].append(s["wind_speed_night"])
                    output_dict["wind_dir_night"].append(s["wind_dir_night"])
    dframe = pd.DataFrame(output_dict)
    return dframe
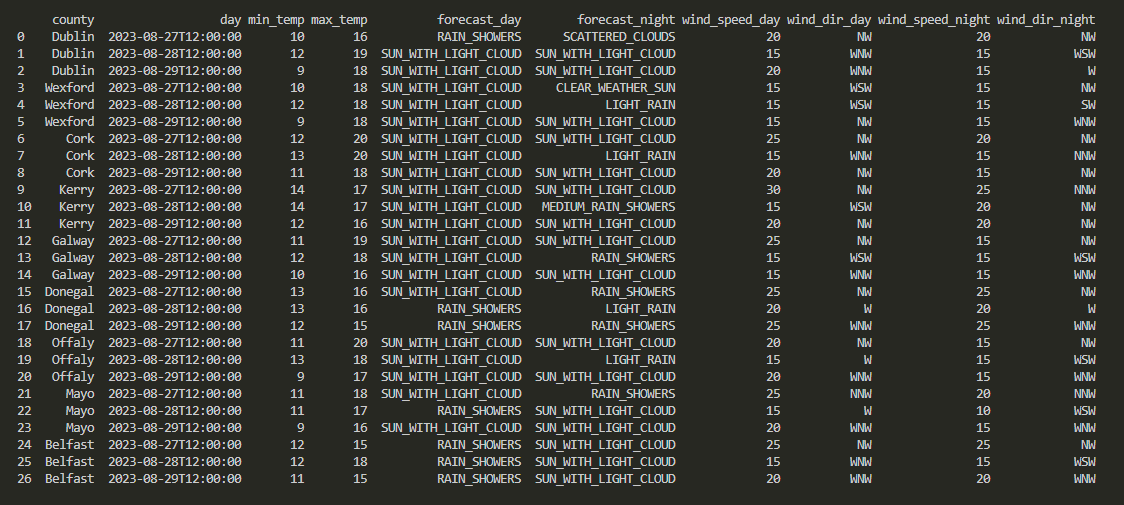
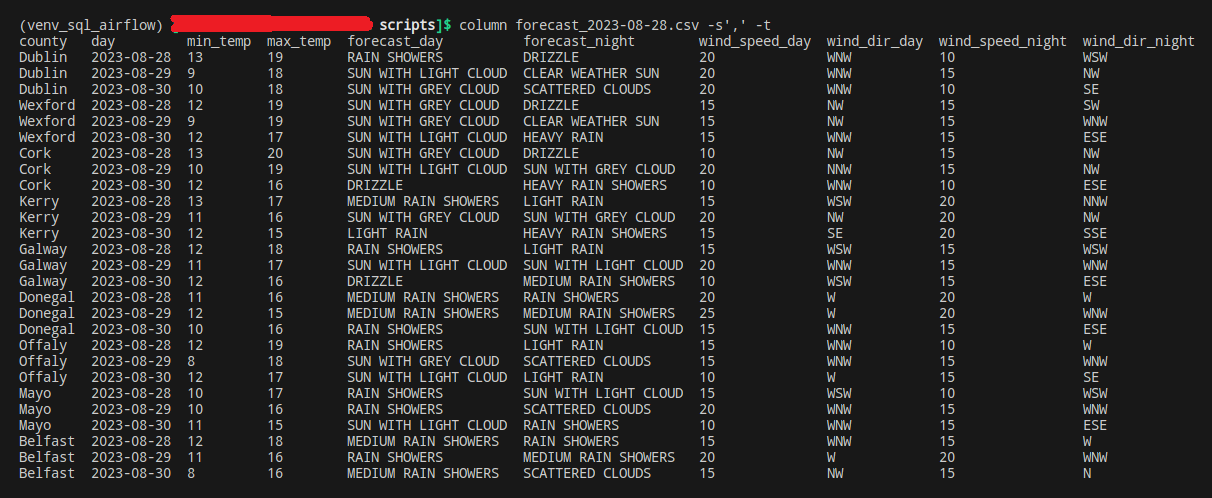
You’re probably wondering what this output_dict argument looks like, and we’ll get to it in a minute! For now, please note that running this newly created getMainDataFrame() function also creates a local copy of our dataframe, in csv format. Which we can easily visualise by running a simple command:
column forecast_2023* -s',' -t'
Last but not least, why not create a second table that leverages the Geopy library to store the latitude and longitude coordonates of our top cities:
from geopy.geocoders import Nominatim

def getStationsDataFrame(input_json,output_list):
    geolocator = Nominatim(user_agent="MyApp")
    for k,v in input_json["forecast"].items():
        if k == "station":
            for station in v:
                location = geolocator.geocode(station["location"])
                output_list["Station"].append(station["location"])
                output_list["Lat"].append(location.latitude)
                output_list["Long"].append(location.longitude)
    dframe = pd.DataFrame(output_list)
    dframe.to_csv(f"stations{date.today()}.csv",index=False)
    return dframe
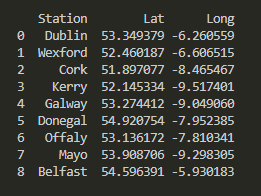
Let’s create a new file, this time called main.py and import some more libraries as well as the functions we wrote earlier when working on our data_functions.py file:
import configparser
import requests
import xmltodict
import json
import pandas as pd
import sqlite3
from sqlite3 import Error
from geopy.geocoders import Nominatim
from data_functions import fetchData, getWeatherDataFrame, getStationsDataFrame
Remember earlier when we said we wouldn’t go through the hassle of using DML statements to generate SQLite tables? Well we’re still going to need some sort of data structure where we can temporarily store the output of our main json file. Back to what we discussed earlier, these are the dictionaries that will be passed as arguments for our json-to-Pandas functions (output_dict and output_list respectively):
struct_weather = {
    "city": [],
    "day": [],
    "min_temp": [],
    "max_temp": [],
    "forecast_day": [],
    "forecast_night": [],
    "wind_speed_day": [],
    "wind_dir_day": [],
    "wind_speed_night": [],
    "wind_dir_night": []
}

struct_stations = {
    "Station": [],
    "Lat": [],
    "Long": []
}
While we’re here, here’s how to access the setup.ini file that we created earlier:
cp = configparser.ConfigParser()
cp.read("setup.ini")

url = cp["PATHS"]["weather_url"]
db = cp["PATHS"]["db"]
And we’re good to go! Let’s add a few more lines of code and run python main.py:
if __name__ == "__main__":
    try:
        raw_data = fetchData(url)
        df_forecast = getWeatherDataFrame(raw_data,struct_weather)
        df_stations = getStationsDataFrame(raw_data,struct_stations)
    except Error as e:
        print(e)
As can be expected, this script will create two separate dataframe objects and save them as csv files.
But we can do better: as we want to keep collecting new forecasts each day, why not start storing them within a SQL database?
Let’s create a new file, this time called db_functions.py. We’ll need the following modules this time:
import sqlite3
import pandas as pd
from sqlite3 import Error
As well as a simple function that establishes a connection to the database, whose name is passed as an argument when the said function is called. Please note that if the database doesn’t exist, SQLite will create one for us:
def getConnection(db_file):
    conn = None
    try:
        conn = sqlite3.connect(db_file)
        print(f"Connection established to {db_file}")
        return conn
    except Error as e:
        print(e)
The reason why we chose to use Pandas to set and update tables, is that its to_sql() method makes everything far easier. We only need two arguments: a connector to a database, and the name of the table. Please note that if_exists= should be set to "append" unless you want to overwrite all the existing records within your table:
def updateTable(db_file,input_df,table_name):
    conn = getConnection(db_file)
    try:
        input_df.to_sql(
            table_name,
            conn,
            if_exists="append",
            index=False
        )
        conn.close()
        print(f"Table {table_name} successfully created / updated")
    except Error as e:
        print(e)
Now that we have these two new functions, let’s head back to our main.py file and import them:
from db_functions import getConnection, updateTable
We also need to slightly amend the last few lines of our script, to make sure we’re sending the content of these Pandas dataframe objects onto our database:
if __name__ == "__main__":
    try:
        raw_data = fetchData(url)
        df_temp = getWeatherDataFrame(raw_data,struct_weather)
        df_forecast = cleanDataFrame(df_temp)
        df_stations = getStationsDataFrame(raw_data,struct_stations)
        updateTable(db,df_forecast,"forecast")
        updateTable(db,df_stations,"stations")
    except Error as e:
        print(e)
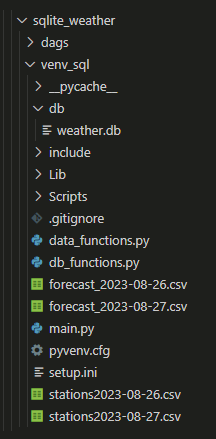
And we’re done!
Apache Airflow 101
Why should we use Airflow, Apache NiFi, or any similar workflow management platform? After all, our pipeline is running, and if we needed to we could simply set a task in Task Manager if we’re on a Windows machine, or schedule a Cron job if we’re using a Linux distro or MacOS. Well Airflow simply makes it much easier to run and monitor multiple pipelines. Its interface helps visualise what ran and what failed to, as well as offering some very useful debugging utilities.
But well do I know that a picture is worth a thousand words, so let’s head back to our virtual environment and install the following module:
pip install apache-airflow
Regardless of the Linux distro that you’re using (I’m running Manjaro), this will automatically create an airflow folder at /home/username/airflow/. First thing first, we should set up an admin account:
airflow users create --username 'admin' --password '1234' --email 'admin@noemailaddress.com' --firstname 'ad' --lastname 'min' --role Admin
Now head over to the airflow folder (/home/username/airflow/) and open the airflow.cfg file. Under [core], make sure that the following values are set as follows:
[core]
dags_folder = /home/username/airflow/dags
load_examples = False
Get back to your terminal, and still within your virtual environment, type:
apache standalone
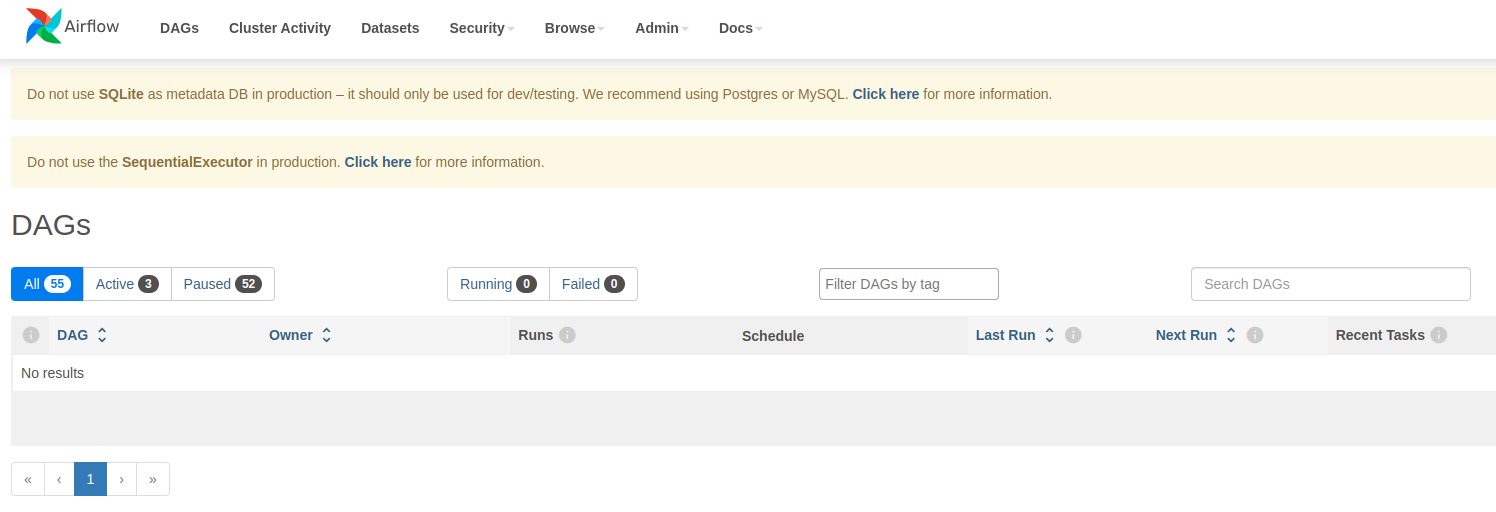
Now open up a web browser and head over to http://localhost:8080/. If everything worked as expected, you should be prompted to log into the Airflow UI, using the username and password that we set up earlier:
As briefly mentioned in the opening lines of this article, I’m assuming that you’re already a bit familiar with Airflow. In the /home/username/airflow/dags folder, let’s create a new file named weather_dag.py and paste the following lines into it:
from airflow.models.dag import DAG
from airflow.decorators import dag, task, task_group
from datetime import datetime
Creating a DAG is pretty straightfoward, especially if we use the dag decorator:
@dag(start_date=datetime(2023, 8, 23), schedule="@daily", catchup=False)
def testing_the_waters():

    @task
    def say_hi():
        print("Hello, world!")

    say_hi()

testing_the_waters()
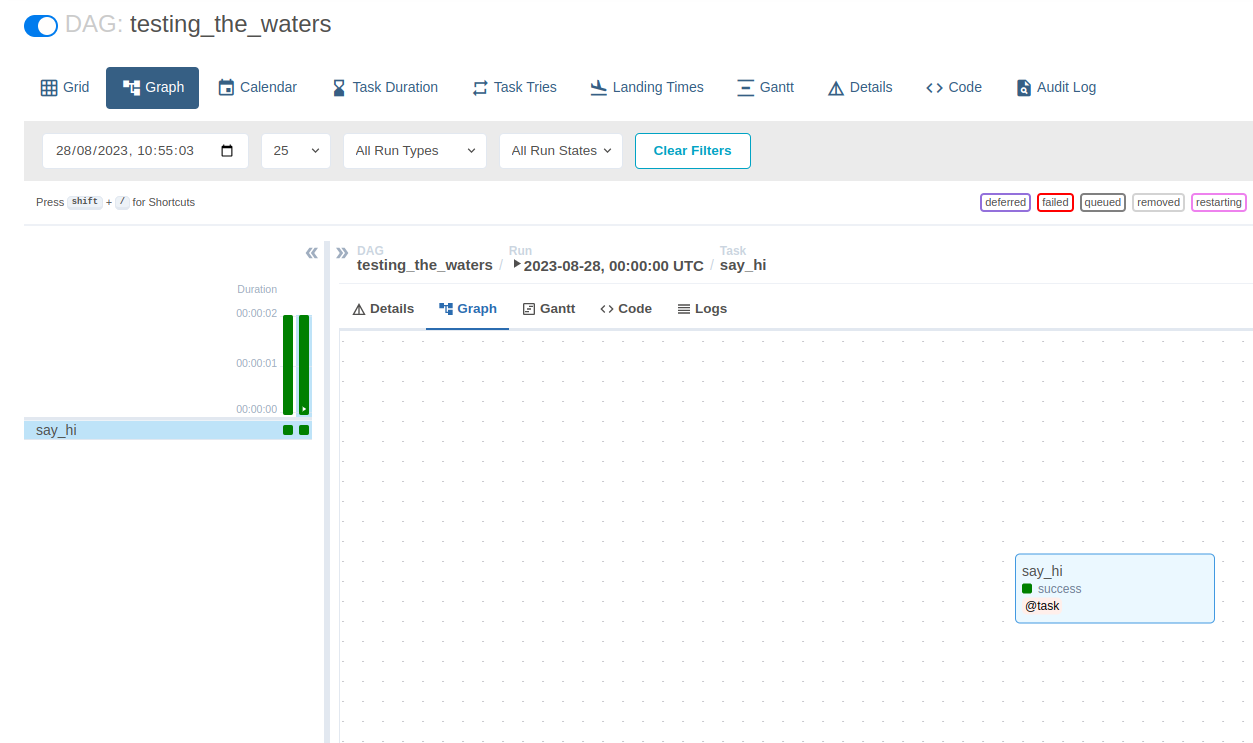
After we restart Airflow (ctrl + c), we’re greeted with a brand new DAG:

When we hit the “Trigger DAG” button (the arrow on the right), the DAG runs and Airflow then shows the following results:
So how do we use this TaskGroup thing then? Well that’s pretty easy. We first have to declare any task that we later want to group, and then call them within the @task_group decorator:
@dag(start_date=datetime(2023, 8, 23), schedule="@daily", catchup=False)
def testing_the_waters():

    @task
    def say_hi_once():
        print("Hello, world!")

    @task
    def say_hi_twice():
        print("Hello, world!")

    @task_group
    def say_hi_combined():
        one = say_hi_once()
        two = say_hi_twice()
        [one, two]

    say_hi_combined()

testing_the_waters()
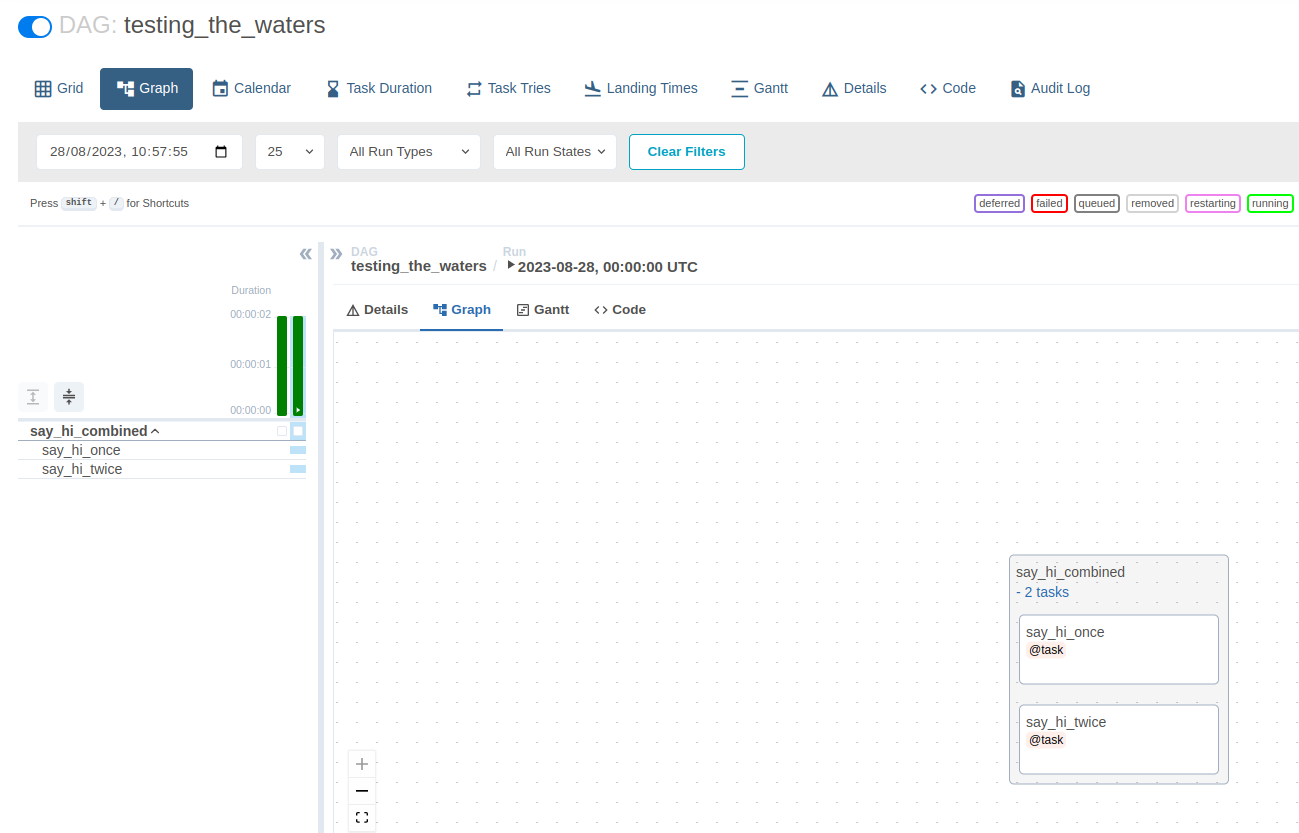
We first declared say_hi_once() and say_hi_twice() as tasks, using the @task decorator. We then called these tasks within a new function that we declared under the @task_group decorator. Finally, we called these two functions, and the global DAG (testing_the_waters()).
Please note that we could have writen one >> two instead of [one, two] and have the two functions run one after the other.
A fancier pipeline
As can be expected, we’re going to have to slightly amend our data_functions.py file. The only major change there is that we’ll have to remove the second argument that is being passed into the getWeather() and getStations() functions. If you remember, we’re talking about the struct_weather and struct_stations dictionaries. We’re not getting rid of them, but we’re now directly inrcorporating them within the aforementioned functions instead:
import requests
import xmltodict
import json
import pandas as pd
from geopy.geocoders import Nominatim
from datetime import date

def fetchData(url):
    req = requests.get(url)
    decoded = req.content.decode("utf-8")
    decoded_json = json.loads(
        json.dumps(
            xmltodict.parse(
                decoded
                )
            )
        )
    return decoded_json

def getWeather(input_json):
    struct_weather = {
        "county": [],
        "day": [],
        "min_temp": [],
        "max_temp": [],
        "forecast_day": [],
        "forecast_night": [],
        "wind_speed_day": [],
        "wind_dir_day": [],
        "wind_speed_night": [],
        "wind_dir_night": []
    }
    for k,v in input_json["forecast"].items():
        if k == "station":
            for station in v:
                for s in station["day"]:
                    struct_weather["county"].append(station["location"])
                    struct_weather["day"].append(s["date"])
                    struct_weather["min_temp"].append(s["min_temp"])
                    struct_weather["max_temp"].append(s["max_temp"])
                    struct_weather["forecast_day"].append(s["weather_text"])
                    struct_weather["forecast_night"].append(s["weather_textN"])
                    struct_weather["wind_speed_day"].append(s["wind_speed"])
                    struct_weather["wind_dir_day"].append(s["wind_dir"])
                    struct_weather["wind_speed_night"].append(s["wind_speed_night"])
                    struct_weather["wind_dir_night"].append(s["wind_dir_night"])
    return struct_weather

def getStations(input_json):
    struct_stations = {
        "Station": [],
        "Lat": [],
        "Long": []
    }
    geolocator = Nominatim(user_agent="MyApp")
    for k,v in input_json["forecast"].items():
        if k == "station":
            for station in v:
                location = geolocator.geocode(station["location"])
                struct_stations["Station"].append(station["location"])
                struct_stations["Lat"].append(location.latitude)
                struct_stations["Long"].append(location.longitude)
    return struct_stations

def getDataFrame(input_data,csv_name):
    dframe = pd.DataFrame(input_data)
    dframe.to_csv(f"{csv_name}_{date.today()}.csv",index=False)
    return dframe
Meanwhile, our db_functions.py remains unchanged:
import sqlite3
import pandas as pd
from sqlite3 import Error

def getConnection(db_file):
    conn = None
    try:
        conn = sqlite3.connect(db_file)
        print(f"Connection established to {db_file}")
        return conn
    except Error as e:
        print(e)

def updateTable(db_file,input_df,table_name):
    conn = getConnection(db_file)
    try:
        input_df.to_sql(
            table_name,
            conn,
            if_exists="append",
            index=False
        )
        conn.close()
        print(f"Table {table_name} successfully created / updated")
    except Error as e:
        print(e)
The changes made to the data functions should leave our weather_dag.py file a bit cleaner. Speaking of which, let’s go through what it now looks like:
from airflow.models.dag import DAG
from airflow.decorators import dag, task, task_group

from data_functions import fetchData, getWeather, getStations, getDataFrame
from db_functions import getConnection, updateTable

from datetime import datetime, timedelta
import configparser
import requests
import xmltodict
import json
import pandas as pd
import sqlite3
from sqlite3 import Error
from geopy.geocoders import Nominatim
Our setup.ini file hasn’t changed either:
cp = configparser.ConfigParser()
cp.read("/home/username/airflow/dags/setup.ini")

url = cp["PATHS"]["weather_url"]
db = cp["PATHS"]["db"]
All that’s left to do, is apply the exact same steps we took when we built our basic pipeline, and try to build an Airflow DAG using the approach we saw earlier when we created a grouped task. Here’s how we can do that:
@dag(start_date=datetime(2023, 8, 23), schedule="@daily", catchup=False)
def getWeatherPipeline():
    @task
    def pipeline_extract():
        raw_data = fetchData(url)
        return raw_data

    @task
    def pipeline_transform_one(data):
        dict_weather = getWeather(data)
        return dict_weather

    @task
    def pipeline_transform_two(data):
        dict_stations = getStations(data)
        return dict_stations

    @task_group
    def pipeline_transform(data):
        dict_weather = pipeline_transform_one(data)
        dict_stations = pipeline_transform_two(data)
        return {
            "dict_weather": dict_weather,
            "dict_stations": dict_stations
            }

    @task
    def pipeline_load_dataframe(data,csv_file):
        df = getDataFrame(data,csv_file)
        return df

    @task
    def pipeline_load_sql(database,data,table_name):
        table = updateTable(database,data,table_name)
        return table

    @task_group
    def pipeline_load(data):
        df_forecast = pipeline_load_dataframe(data["dict_weather"],"forecast")
        df_stations = pipeline_load_dataframe(data["dict_stations"],"stations")
        table_forecast = pipeline_load_sql(db,df_forecast,"forecast")
        table_stations = pipeline_load_sql(db,df_stations,"stations")
        df_forecast >> table_forecast
        df_stations >> table_stations

    pipeline_load(pipeline_transform(pipeline_extract()))

getWeatherPipeline()

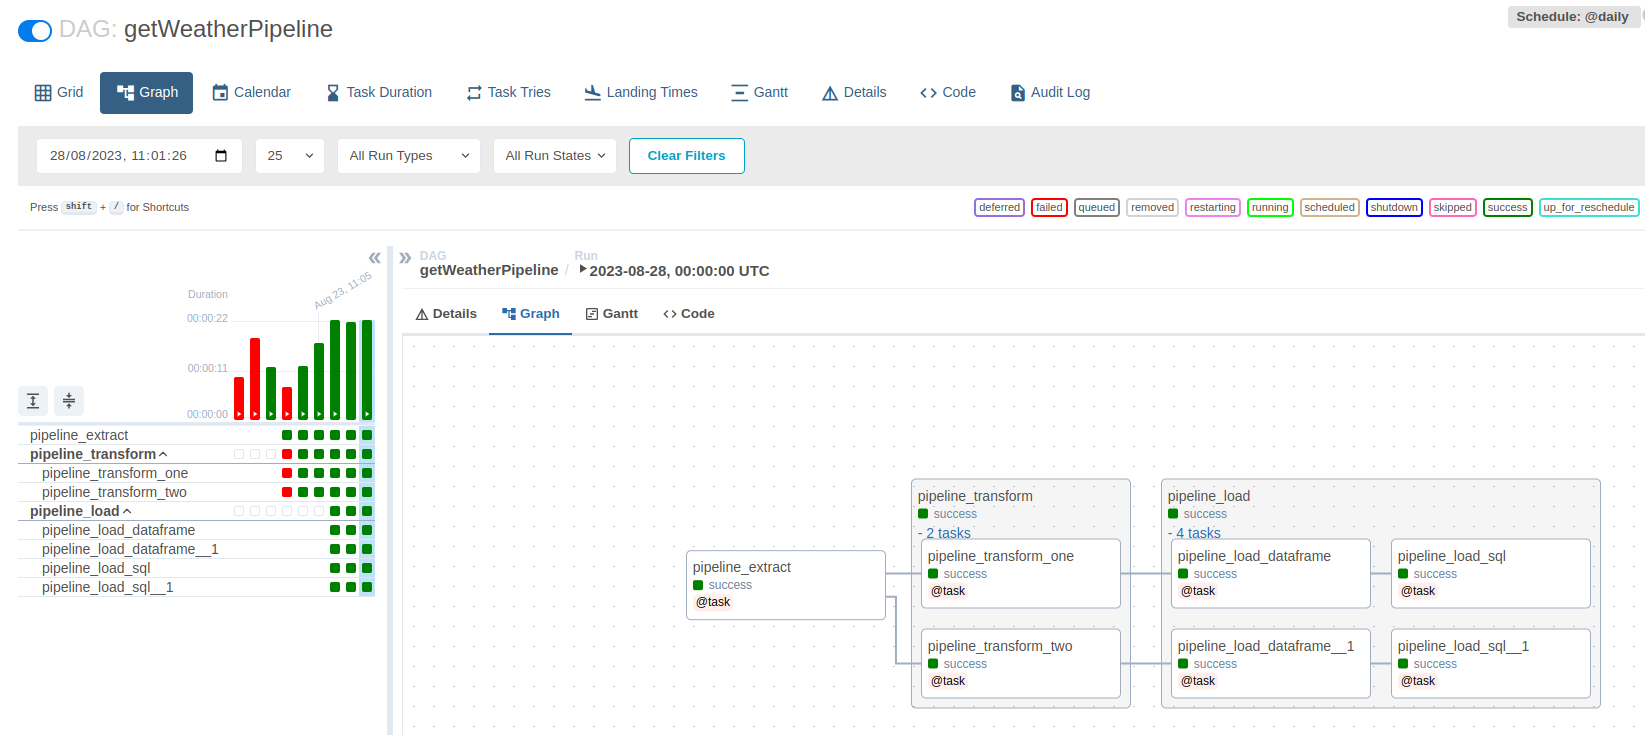
This is what our DAG graph shows now: an ungrouped task, and two grouped task. The first grouped task contains two tasks, while the second one has four. The only tricky bit here, is ensuring that we are properly passing arguments from one task to the other. This is taken care of when the final line of the getWeatherPipeline() DAG is called: pipeline_load(pipeline_transform(pipeline_extract())).
I hope you enjoyed reading this article, please feel free to reach out to me is you have any comment!